One tool that is commonly used in e-learning development is MS Word. While it may seem like a simple program, there are a ton of little-known tips and tricks that can make developing your next e-learning storyboard a breeze.
If you’re someone who is serious about instructional design, this might seem trivial to you. “Learn the trade, the tools come later.” is a trope I’ve parodied several times in my life. I still do.
But here’s the thing. When your next project comes around, do you want to focus on all the things that are important, like coming up with a fantastic design, and being able to put all your ideas down on paper? Or do you want to be figuring out how to work with a Word document?
Hopefully I’ve made my point. So let’s get down to it?
Find and Replace
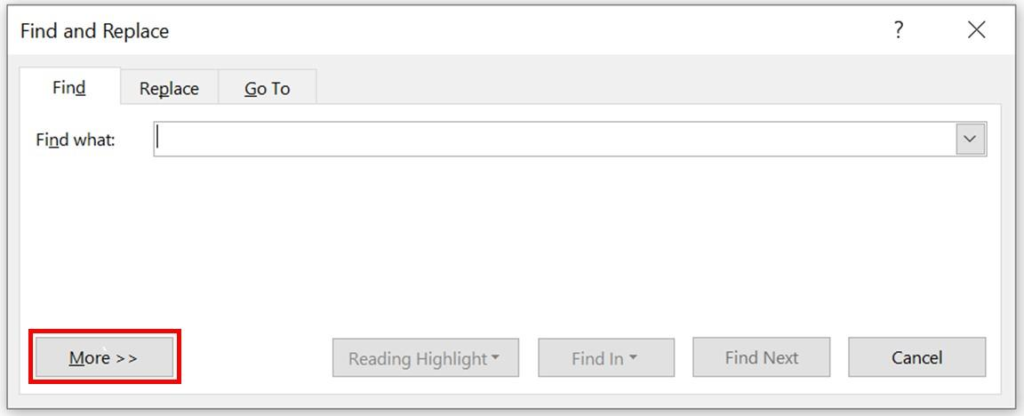
This function allows you to quickly make large-scale changes to your storyboard. Nothing new about that. However, did you know about the concealed treasures hidden in this innocuous little element? Well, all you need to do to reveal these hidden treasures: click More in the Find window.

When you do, you get to see a whole lot of options that regular users don’t see. Take a look.

Let’s look at each of the options:
1. Match case: This option can be helpful when you want to make sure you only replace words with the same capitalization as the search string. For example, let’s say you’ve used a character called Cat Phyllis in your storyboard. At the same time, a house cat features in your storyboard as well. You want to replace the house cat with a dog, but not the first name. So, in your Find box, type “cat” in lowercase, and select the “Match case” option. This will ensure that you don’t end up with several instances of Dog Phyllis in your storyboard 😊.
2. Find whole words only: This can be helpful when you want to make sure you only replace complete words, and not parts of other words. Carrying the same example forward, you want to replace cat with dog, but not catalog with dogalog.
3. Use wildcards: This can be incredibly helpful when you want to find multiple variations of a word or phrase that have a common pattern. For example, to find all occurrences of a phone number with a particular area code, even if the rest of the digits are different. Here are a few other examples.
| WILDCARD | DESCRIPTION | TYPE IN FIND WINDOW | WHAT IT WILL FIND |
| ? | Any single character | b?t | will find bat, bot, and bit |
| * | Any number of characters | b*t | in addition to finding bat, bot, and bit, will also find ballpoint, biologist and backlit |
[ ] | One of these characters | b[ai]n | will find ban and bin, but not ben |
| ! | Not this character(s) | b[!ai]n | will find ben and bun, but not ban or bin |
| \ | Not a wild card | [ae]\? | will find a? and e? |
I use wildcards all the time to look for and weed out punctuation issues in my documents. For instance, every comma should have a space after, but not before.
Solution: ,[! ]

There are dozens of wildcards, and I’m not going to list all of them here. That’s because they’re one Google (or whatever search engine you’re using) away 😊. But I’ve shared a few examples here to make you aware of their existence, and how they can be incredibly useful when you’re working with documents.
4. Special: This option helps you find special characters such as tabs or paragraph marks in your document.
Let’s say you have been tasked with editing a colleague’s storyboard. The storyboard is nearly complete, but there is inconsistent line spacing throughout. Throughout the document, you find that there are multiple extra lines between paragraphs instead of one. One way to correct it is to press the Delete key every time you see an extra line. But there’s a faster way:
a. Click Show/Hide on the Home tab on your ribbon.

This will display all the paragraph marks in your document.
b. Search for every occurrence of two paragraph marks and replace it with one paragraph mark.

^p is the paragraph mark symbol. So you can see in the above screenshot that I’ve added ^p^p in the Find what box, and ^p in the Replace with box.
Simply repeat this Find and Replace process until all double paragraphs marks are replaced with one. This will ensure that your document is clean, without any extra line spaces.
Similar to wildcards, there are many special characters, and it would be cumbersome to cover all of them here, but the screenshot below gives you an idea of what you see when you click Special in the Find window. Feel free to explore all the options at your leisure.

5. Sounds like: This option finds words that sound like the word in the Find what box. For example, if you search for “Horse”, Word also finds “hoarse”. However, I haven’t found a reliable use for this feature, so I mostly skip it.
6. Find all word forms: You can use this option to search for all forms of a word, such as singular and plural versions. For example, if you search for “eat,” Word finds “eat”, “ate”, “eaten”, and “eating”.
7. Match prefix and Match suffix: These options match words beginning or ending with the search string. For example:
- Match prefix: Searching for “pre” returns “prepare”, “present”, “pressure”, etc.
- Match suffix: Searching for “ing” returns “typing”, “bling”, “thing”, and so on.
8. Ignore punctuation characters: This option ignores punctuation characters between words. For example, a search for “zebra fish and monkey” would return “zebra, fish, and monkey” as well as “zebra fish and monkey”. This could be useful for fixing problems with serial commas.
9. Ignore white-space characters: This option ignores all white space between words. For example, “cellphone” finds “cell phone” as well as “cellphone”. This is the opposite of “Find whole words only” and could be useful for finding words that are spelled differently in different instances.
10. Format: This option helps when you only want to find instances of the search term that are formatted in a certain way, such as being a certain font or size. This is extremely useful if, for instance, you want to find only text that you’ve highlighted in green throughout the document, or text in italics.
Track Changes and Comments
You’re already familiar with the Track Changes and Comments features in MS Word, and you probably use them to track edits and comments made by reviewers.
However, sometimes you could have multiple reviewers collaborating on a document. Even though Word color codes the edits and comments from each collaborator individually, things can get really out of hand and confusing when you have multiple edits and overwrites happening.
To clear things up, use the Show Markup option in the Review tab of your ribbon.

Using this option, you can show or hide the types of edits or comments you want to see. You can also choose to view edits or comments from a particular reviewer, and so on.
Text Wrapping Around Images
I used to find it really annoying that pasted images would shift when I edited the surrounding text in my storyboard. This was a big issue especially with in-progress storyboards, because you’re always adding and editing the content, and as a result, you’ve to constantly keep moving the images so they remain where they are supposed to.
All this changed when I discovered the image wrapping feature. Basically, all you’ve got to do when you paste an image is to tell Word that the image should be treated exactly like text. So when you add a line of text above the image, it will move down, and so on.
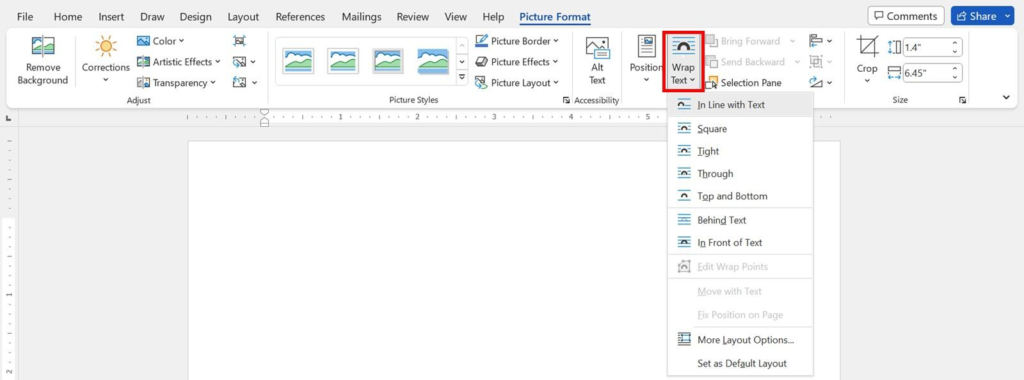
To do this, select the image you’ve just pasted into your document, and then click Wrap Text under the Picture Format tab in your ribbon. In the drop-down that comes up, select In Line with Text.

You can also set images to be always pasted in the In Line with Text mode. To do this, click the File tab on your ribbon, and then Options. In the window that pops up, navigate to the Advanced tab, and select the option highlighted below.

—
So, that’s a wrap for this article.
I’d encourage you to look around and see what other options are available that you can take advantage of. Word might seem like a simple program to begin with, but it’s got plenty of features, and you will be surprised at how much time you can save with some of these tricks.
Happy storyboarding!
Written by Srividya Kumar, Co-Founder @ Learnnovators


